SSH Remote System Access behind firewalls
This article outlines methods for establishing SSH remote connections to a client machine located behind a firewall, utilizing a reverse SSH proxy through a jump host. It also covers obtaining temporary root access on the client.
Overview
For clients requiring remote support and access to their systems, we offer a robust solution leveraging SSH reverse proxy technology and secure methods for temporary root access. This setup allows our support team to securely connect to your machines, even when they are behind a firewall, and perform necessary administrative tasks.
The approach consists of three main components:
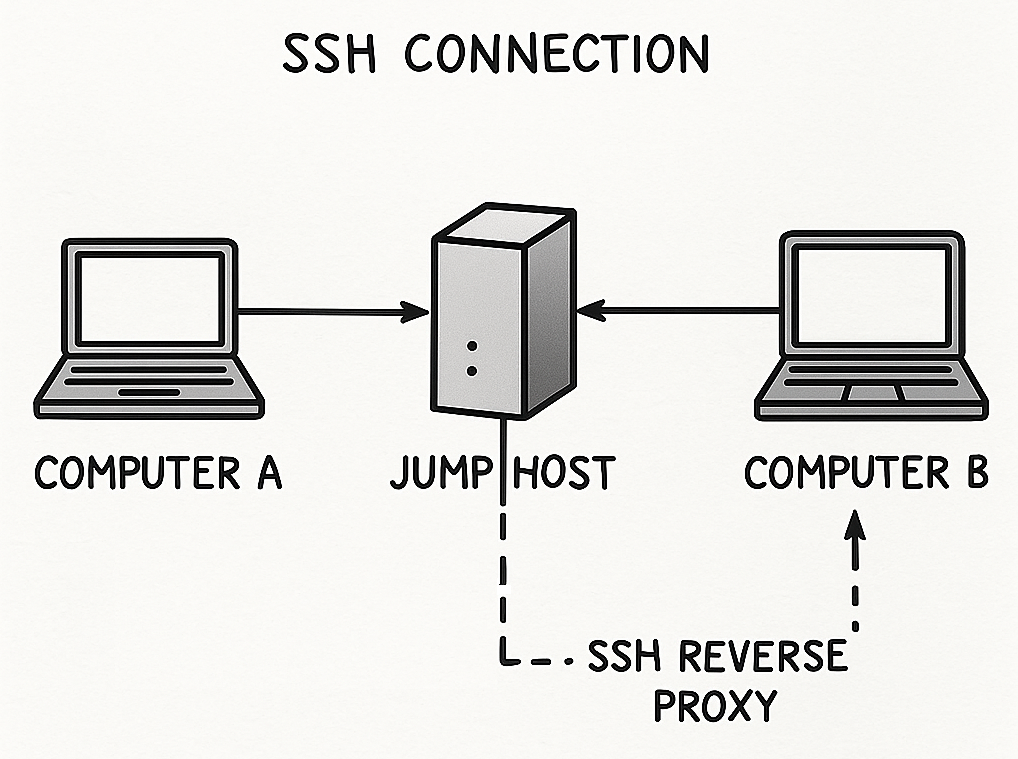
- Setting up Remote System Access via SSH: This is the foundation of our remote support, enabling a secure connection to your machines through a “jump host” (proxy server). This method ensures that we can reach your systems without compromising your network security.
- Creating a Secure SSH Remote Connect Tunnel Behind a Firewall: This document details the process for establishing the reverse SSH tunnel from your client machine to our jump host. This is crucial for initiating the connection from your side, bypassing firewall restrictions.
- Granting Temporary Root Access: Once a secure connection is established, we may require elevated privileges to perform certain maintenance or troubleshooting tasks. This section outlines the safe and temporary methods we can use to gain the necessary root access on your system.
How it Works:
The client machine establishes a secure, outbound connection to our designated jump host. This “reverse tunnel” makes your machine accessible to our authorized support team through the jump host, without needing to open inbound ports on your firewall. When support is needed, we connect to the jump host, and then through the established tunnel, directly to your machine. For administrative tasks, temporary root access methods are employed, ensuring that elevated privileges are only granted for the duration of the support session and can be revoked easily.
Your Public SSH Key for Access:
To facilitate secure connections from our end to your systems, you will need to provide your public SSH key. This key is used to authenticate our support team to your jump host, ensuring that only authorized personnel can establish connections.
Our public SSH key is:
ssh-ed25519 AAAAC3NzaC1lZDI1NTE5AAAAIMYNvt3ON4Xf6NplwkhVui9YzVsw3fjOIxZxp7GfTmqv remote-connect@miraitech
For the client machine
Here are the necessary steps for the client to establish the SSH reverse proxy connection:
- Get the Public Key from the Client:
The client needs to retrieve their public SSH key. This can be done usingcat ${HOME}/.ssh/id_rsa.pubor
cat ${HOME}/.ssh/id_ed25519.pubfor newer systems.
-
Create the SSH Key (if missing): If the client doesn’t have an SSH key pair, they must create one using
ssh-keygen. They should not enter a password when prompted during this process. - Add our public SSH key:
Use your favourite editor and add the key to${HOME}/.ssh/authorized_keys.ssh-ed25519 AAAAC3NzaC1lZDI1NTE5AAAAIMYNvt3ON4Xf6NplwkhVui9YzVsw3fjOIxZxp7GfTmqv remote-connect@miraitechEither copy or download the key from here miraitech_ed25519.pub. Make sure the file has the correct permissions:
chmod 600 ${HOME}/.ssh/authorized_keys - Create a Tunnel from the Client Machine:
The client connects to the jump host (ssh-proxy_server container) and opens a reverse tunnel. This tunnel forwards a specified port on the jump host to port 22 (SSH) on the client’slocalhost. The command typically used is similar tossh ${SSH_PROXY} -p 11111 -l backflip -R ${R_PORT}:localhost:22 -N -T -v - (Optional) Add Jump Host to ssh_config:
To simplify the tunnel command, the client can add the jump host details to their~/.ssh/configfile. - (Optional) Give Temporary Root Access: Follow these steps.